Christmas is right around the corner with just about a few weeks to go, and there is no need to splurge on expensive gifts this year. Instead, there are plenty of fun DIY gift ideas for the whole family that are bound to make your loved one's smile. Why not get a head start? We take you through five stress-free gift ideas to keep the kids entertained during the holidays and create meaningful gifts for the whole family. So let's dive right in!
DIY mint sugar scrub
Nothing embodies relaxation more than soaking in a hot bath with some fancy body products. Opt-out of expensive store-bought options and create something special to gift to your loved ones so they can enjoy some much-needed downtime.
This cheerful green sugar scrub takes only a few ingredients to create a luxurious bath time product. Moreover, it’s entirely inexpensive and effortless to make. You can tinker around with the recipe and discover your creative side with various colours and fragrances. We take you through our favourite minty scrub but go wild and experiment with your favourite scents.
Ingredients
- 1 Tbsp peppermint extract or essential oil or any fragrance you’d like
- 1 drop of green food colouring
- 125 ml of coconut oil
- 400 to 500 g of sugar
Scoop out the coconut oil into a heatproof bowl and place in the microwave until softened but not fully melted. Add the 400g of sugar and the food colouring until evenly distributed and the whole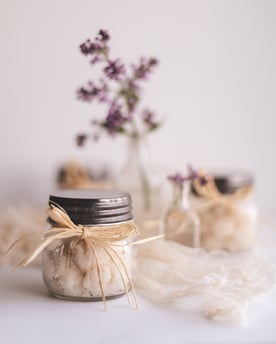 mixture is lovely light minty green.
Dot the peppermint fragrance into the mixture and mix thoroughly. If the mixture is still too wet, add the remaining sugar a tablespoon at a time until you reach the perfect scrub consistency.
Once done, add the scrub into airtight containers like a mason jar or pickling jar. Note that you can recycle any glass jar here for a cost-effective container, as long as the container closes tightly. Clear glass is the best so that you can see the lovely pastel green colour. Add some red and white spun embroidery thread or ribbon to your minty green scrub for a Christmassy touch.
Custom Pet Treat Jar
With all these gifts going around, don't forget to get something for Fido! The perfect gift for friends and family whose pets are as beloved as their children. Often pet treat products and containers aren't the most stylish, and let's be honest; they can be a little smelly as well. So why not create a special treat jar for them to lock in all that pet treat goodness and display them with pride in the kitchen?
Supplies:
- Mason jar (750ml or 1 litre)
- Acrylic paint
- Paintbrushes
- Used wine corks (if you don't drink, you can buy these at a craft store)
- 100 grit sandpaper
- Sealant matte
Prep the jar by wiping it clean of any dust. For a base layer, start with two layers of white paint. With acrylic on glass, you will need to wait overnight to paint the next coat. Once the base layers are dry, make sure there are no streaky lines on the surface; otherwise, you may need a third layer just for good measure. Now you can decorate to your dog's heart's content!
Once the jars are prepped, you can get the kids to join in the fun! Our idea would be to distress the base layer a bit with the sandpaper for a vintage look. You can then use the wine cork to make paw prints. Dip the wine cork in the black paint and stamp on circles. You can finish off the paw prints with three dots above the circles.
The stamping can sometimes be tricky so you may need to roll the cork around and up and down while applying pressure to get a clean circle in some areas. Then, you can leave your designs to dry overnight and finish the project with a matte or gloss spray paint sealant. Now you can spoil the pets with treats out of their very own custom treat jar!
DIY hot chocolate and marshmallows
Everybody loves hot chocolate, and it’s the perfect gift for curling up on the couch together at night after a fun-filled holiday.
Ingredients and supplies:
- 2 cups icing sugar
- 2 cups powdered milk
- 1 cup unsweetened cocoa powder
- Mini marshmallows
- Airtight glass pickling jars
- Ribbon or colourful twin
- Cardboard
- Coloured Pens
- Scissors
If you’re feeling up to painting the jars and getting creative with decorating the cocoa containers, check out the instructions about painting glass jars in the Pet Treat Jar project above.
Making the base cocoa mixture couldn’t be easier. Sift the sugar and cocoa powder in a large bowl to remove any lumps. Stir in the powdered milk and whisk together until everything is evenly distributed. Add the cocoa base to your containers and add your mini marshmallows to the top. Keeps for 6 months in an airtight container.
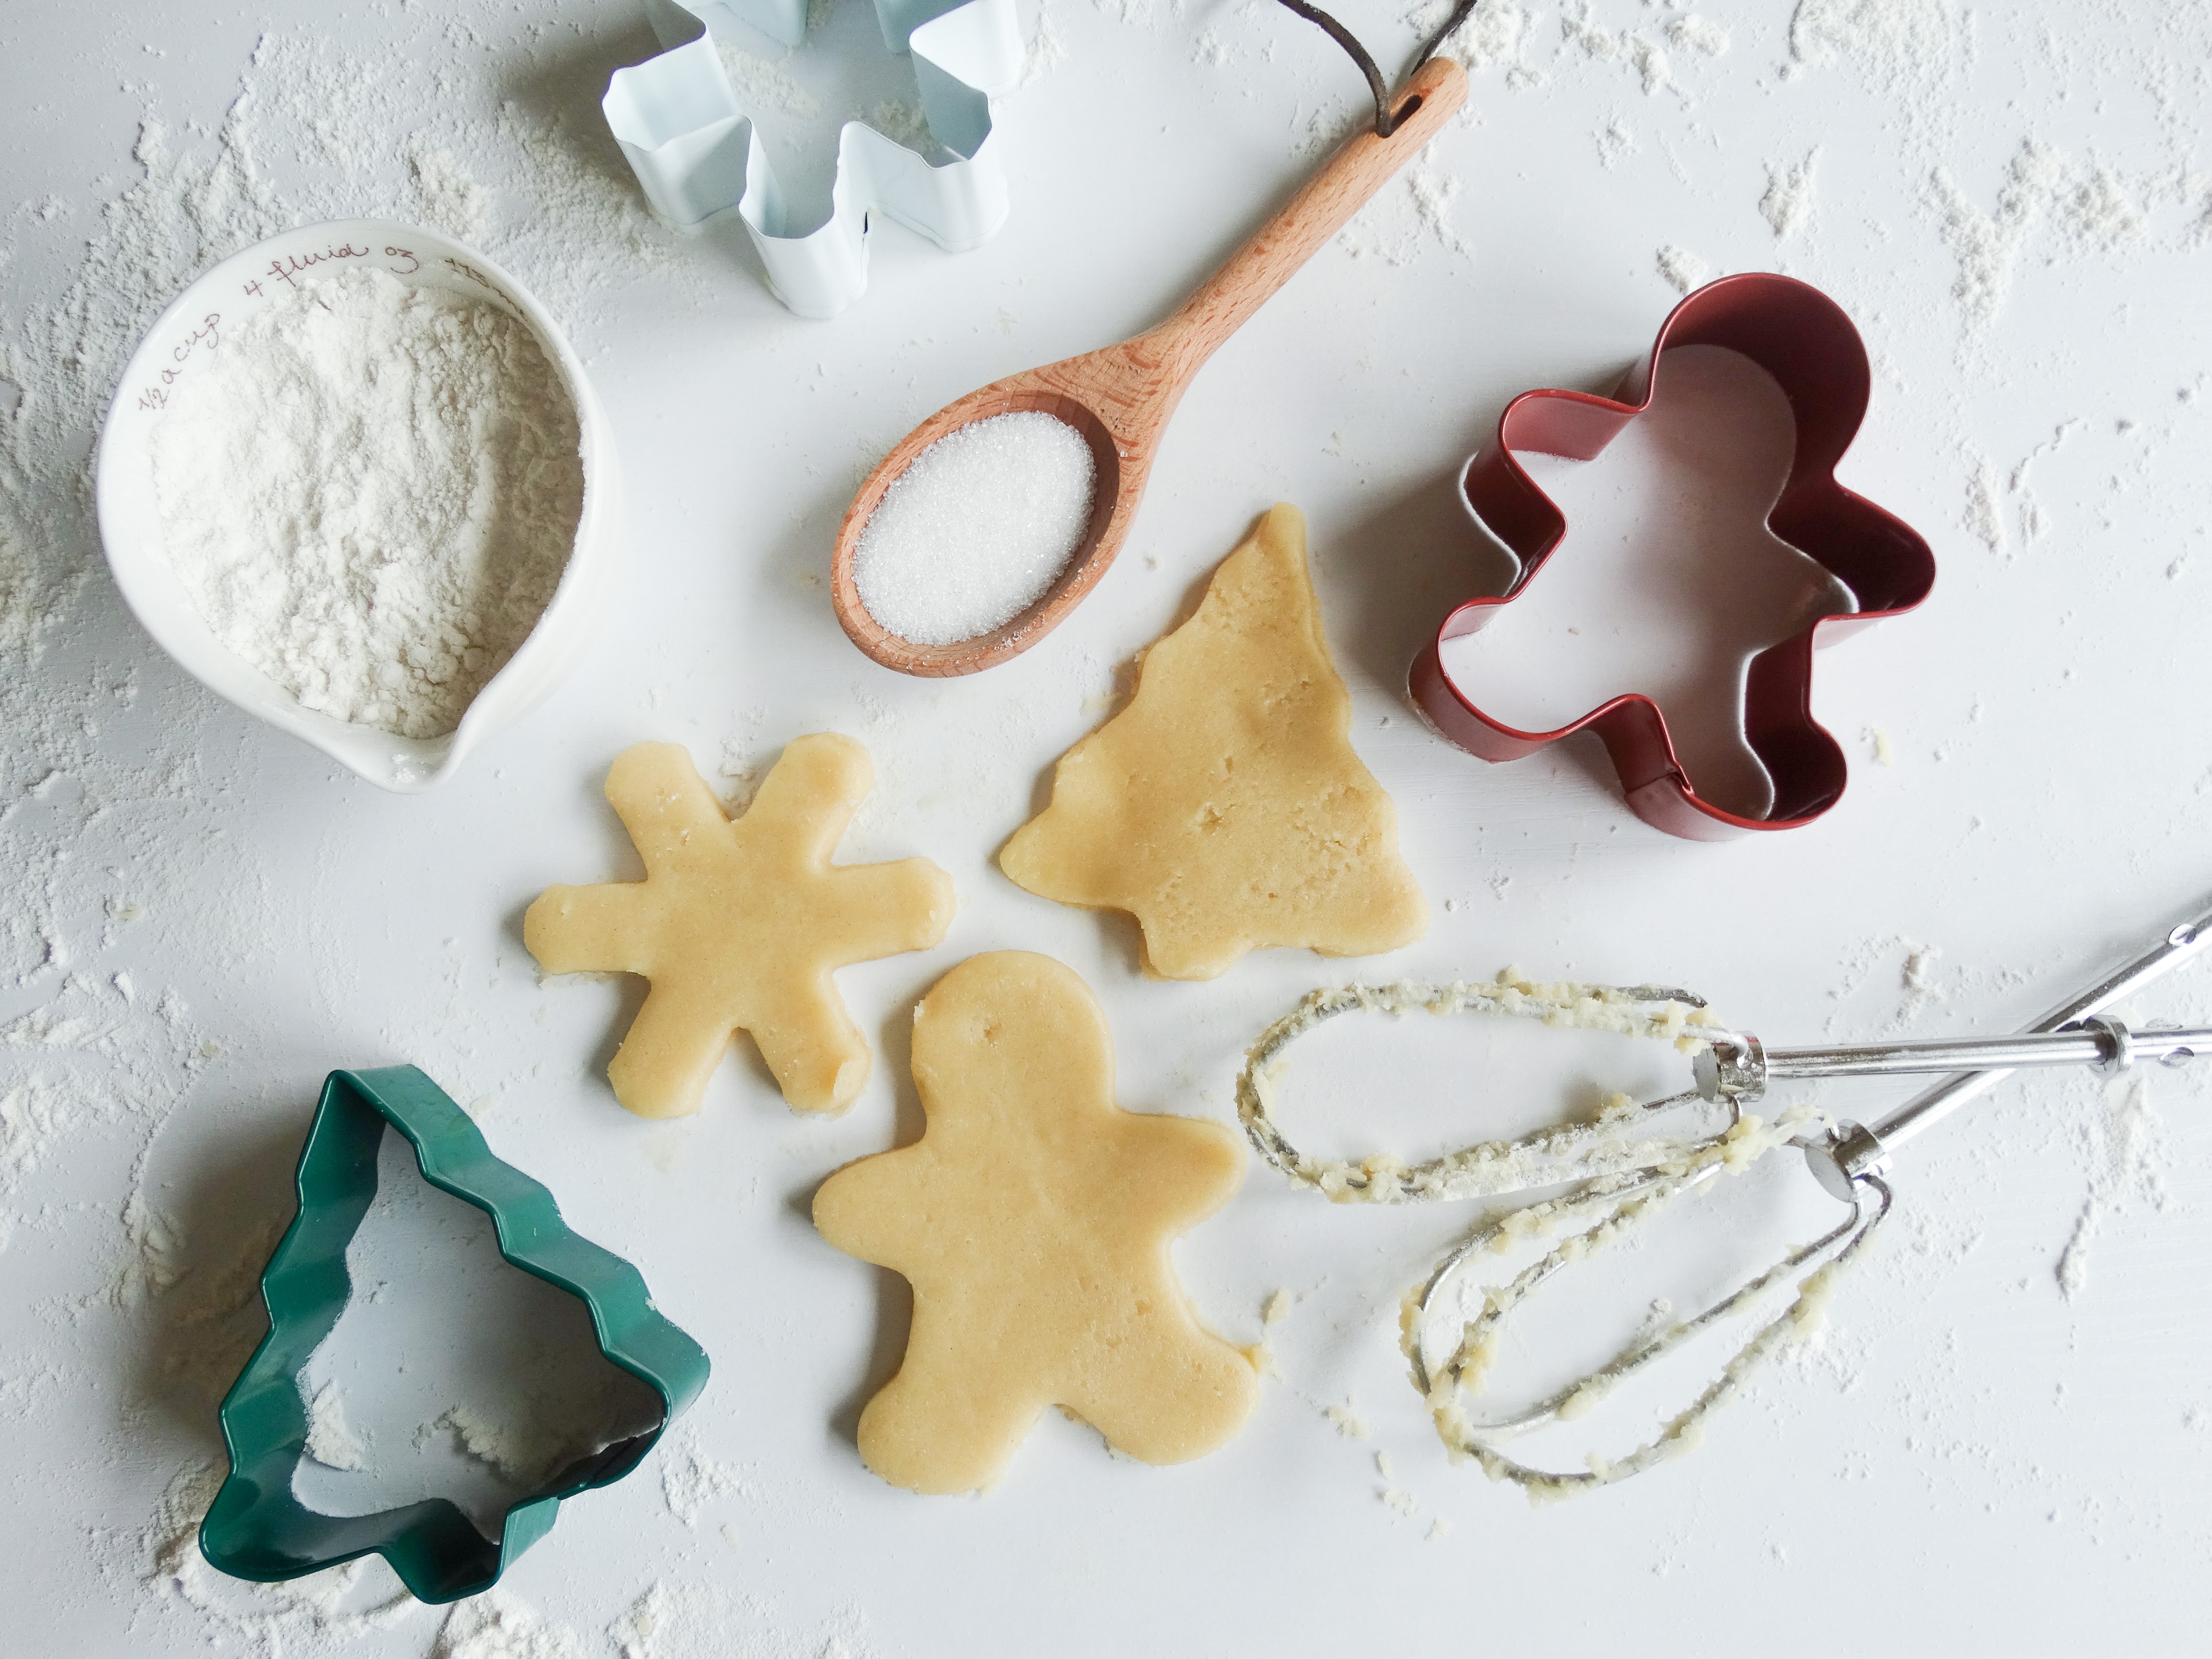
Salt Dough Ornaments
Thinking of creating your own family ornaments? Gearing up for the festive season is a great time to involve the whole family in some Christmassy craft making. This is a wonderful two-day holiday project that you can split between baking one day and decorating the next. And the best part about it is that it uses everyday pantry supplies and only has three ingredients, salt, water and flour. It truly is the perfect last-minute and super cheap activity to keep the kids busy this holiday. You can create a set to gift to the grandparents or family friends too!
Ingredients and supplies
- 4 cups of all-purpose flour
- 250g of regular table salt (pouring, not coarse)
- 370 ml water
- Baking paper
- Drinking straw or skewer
- Rolling pin
- Cookie cutters in your favourite festive shapes
- Glitter or confetti
- Paintbrushes
- Craft paints in a limited colour palette
- Mod podge or decoupage sealant
- Ribbon to hang the ornaments
Creating the salt dough
Whisk the flour and the salt together in a large bowl to ensure the salt is evenly distributed. Next, constantly stir the flour and salt mixture while slowly adding the water about 50 ml at a time. You can use a wooden spoon to help the dough mixture into a consolidated dough ball.
Time to get your hands dirty! The salt dough ball requires kneading to reach the right consistency, but nothing special is required - just knead as if you were making bread. Once you’ve kneaded the dough and are happy with the consistency, chill the dough ball for 1 hour in the fridge. This chilling process helps reduce the stickiness of the dough and makes it easier for the kiddies to roll it out.
Using a piece of baking paper on either side of the dough ball, roll out the dough into a large sheet making sure that it is roughly 2cm to 3cm thick—time to create the shapes using your most beloved cookie cutters. Get creative here; there’s no need to stick to snowmen and reindeer! Christmas dinosaurs, anyone?
Once you’ve maximized the cutting surface, collect all the excess dough and roll it out again and again until it’s all used up. If it gets a little sticky, add a bit of flour or chill it in the fridge.
Your shapes should all be sitting proudly on the counter, ready for the ribbon loop. Create a small hole in each of the ornaments at the top so that you can hang your Christmassy creations. We find that a straw sized hole is a perfect size, but you can use anything.
And now for the real fun! Here you can use kitchen utensils to create texture on the surface of your ornament. Think peelers, forks, apple corers, potato mashers, citrus squeezers, toothpicks, and box grater to stamp on designs.
Time to bake them: Place them on a baking tray and in the oven at 150 degrees Celsius for an hour. The ornaments should be hard once baked and set aside to cool completely before decorating.
Bring the ornaments to life by painting and adding glitter or fine confetti. You can use all the colours of the rainbow or you could choose a limited colour palette so that the final set is coordinated!
We’re at the home stretch, and all that’s left to do is add a layer of glossy or matte mod podge to seal your final creations. If you want to add glitter or fine confetti, sprinkle this on while the sealant has just been applied. Now all that’s left to do is to set up the tree and proudly hang your DIY ornament gift set for all to see.
Simple luxury homemade soaps
Who doesn't love some self-care goodies?! It's been a stressful year for many, and budgets are tight. So this is an excellent gift for those in the family in desperate need of some rest and relaxation.
But making soap can be scary as it's often made with lye. Lye is not the safest ingredient, and soap base making is certainly not a suitable activity to get the kids involved.
To avoid the potential dangers of lye or experimenting with creating your soap base from scratch, there are melt and pour premade soap bases that are super safe and easy to work with. This is a great recipe for beginner soap makers, and it is incredibly satisfying when you're left with a luxury end product to gift to your nearest and dearest.
Ingredients
- 500g of soap base (Shea butter, cocoa butter, aloe vera, olive oil, goats milk, honey melt and many more)
- 2 tbsp honey
- 2 tbsp vitamin E oil
- 1 tbsp almond or argan oil
- A few drops of fragrant essential oil of your choice
- This mixture makes a warm and creamy coloured natural soap, but you can also add a few drops of water-based liquid dye to add some colour.
- Silica packets
- Cling Film
- Airtight container for storage
- Moulds of your choice (Silicone or steel)
Instructions:
- Cut the soap base into cm squares
- Microwave in a glass heatproof measuring jug until entirely melted
- While hot, stir in your essential oils, vitamin E and body oil.
- If you're using colourant, add it after mixing in the other oils.
- Pour the mixture into your moulds
- Let it set completely
- Carefully manoeuvre the soaps out of their moulds
- Store for gifting
There's one thing you need to know when storing and gifting these soaps. Melt and pour soaps contain a humectant called glycerin which means that that it draws moisture from the air. The soap can form tiny beads of moisture or "sweat" on its surface in light of this. The best way to prevent these droplets from appearing is to store the soap, once completely hardened, wrapped tightly in cling film and placed inside an airtight container.
To be sure doubly sure that your gifted soaps will have that luxury glossy look when opening, you can add a silica packet into the bottom of the airtight container. Now it's ready to gift, and it will keep its glossy feel before the first use.
If you’re looking for some more DIY gift ideas, check out our post Here